Horizontal Band Saw
| Manufacturer | Kalamazoo |
| Model | H9AW |
Horizontal band saw how to guide
What is a horizontal band saw and what sort of cutting is it good for
A horizontal band saw is a type of band saw where the cutting piece stays stationary and the cutting head pivoting on one end cuts into the part by gravity assist.
The Horozontal Band Saw in the shop is a Kalamazoo model H9AW, it can be used to rough cut metal or plastic (NO WOOD) stock to length. It has a cutting capacity of 9" Round and 9" by 13.5" rectangle at 90 degrees or 8" round and 8" by 8" rectangle when rotated to 45 degrees. The jaws jaws can open to 16" and it has a infinitely adjustable cutting speed between 62 and 390 FPM (REMINDER: only adjust when running) via a belt system.
Operation
General usage procedure overview
-For more specific details see other sections
-Make sure the machine is clean
-Lift handle and lock in position, finger tight on the lock is all that is needed.
-Load material and tighten in vice, Righty tighty lefty loosey, if loose the vice is free to slide by hand.
NOTE: No thin vertical material as it can damage the blade.
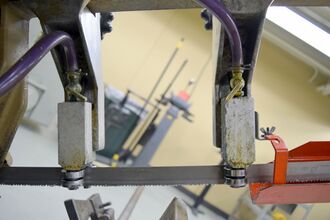
-Adjust blade holders as needed to clear stock, excessive clearance can introduce excessive blade wondering.
-Turn on coolant/ cutting oil if needed
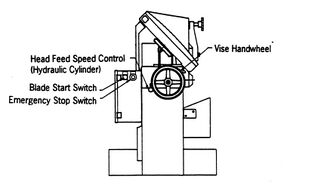
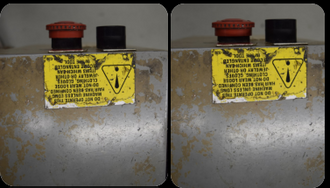
-Place emergency stop button in the extended position.
-Turn on machine (press green button).
-Adjust speed as needed, see speed chart for general guide.
- Slowly turn head speed feed control to the left to let head down.
Ask shop manager about head speed, too slow caused the blade to rub and subsequently dull, to fast forces the blade through the material and can damage it. The head speed should be such that the blade is doing all the work.
-When the cut is done the machine will stop automatically.
- If done remove piece, return speed to default speed (turn on if speed adjustment is necessary) and follow cleaning procedure listed below.
Vice adjustment
Loading Vice
As stated above turning the vice handle to the left loosens it and right tightens it. When the vice isn't clamped down it is free to move by hand, though such may require a bit of force to get it to move (If sticking try loosening the handle a bit.)
Also consider how you are loading the part into the vice, it should not be a large flat piece (such should be done on the vertical band saw). The part should be loaded in a way that it will not loosen or "pop out" when it is being cut and care should be taken to ensure that multiple blade teeth will be in contact with the part as it is cut.
Rotating vice
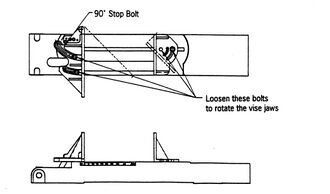
If cutting at an angle other then 90 is desired the angle of the vice can be adjusted up to 45 degrees. To change lift up the cutting head and adjust the bolts as shown in the picture on right. Remember to tighten the bolts before cutting and return the jaws to their default position when done. NOTE: The available stock cutting size reduces to 8" round and 8" square when rotated to the full 45 degrees.
.
Troubleshooting
Pulled from existing mindworks document
No coolant in the trough
- Talk to shop manager and mix appropriate coolant/cutting oil per instructions.
The coolant is not pumping to the blade
-Turn the pump on, the switch is located beneath the vise hand wheel
Not enough coolant getting to the blade
-Adjust the coolant adjusting valves
There is a puddle of coolant beneath the motor
- Clean the shavings built up under the hood cover of the saw
Saftey
sheet on machine
find or rewrite/ update as needed existing safety sheet that is currently on the machine
Never operate the saw unless all guards and covers are in place and closed.
Stay clear of the machine while it is in operation.
Never insert any part of the body into the cutting area of the machine while it is operating.
Never attempt to adjust the stock stop while the saw is in operation.
Never adjust the guide arm while the saw is in operation
Never adjust the blade tension while the saw is in operation.
Always be sure that the blade is fully stopped before loading or unloading the machine.
Always be sure that the material to be cut is securely clamped in the saw vise before starting a cut. Loose material may be thrown from the machine and/or cause damage to the machine itself.
Always support long material from both sides of the work area to prevent the material from falling on the floor.
Never operate this machine unless you fully understand all of the controls and the operating cycles.
Never force a tool or attachment to do a job or operate at a speed is was not designed for.
Speed Chart
NOTE: THESE SPEEDS ARE AVERAGE FOR BI-METAL BLADES. IF YOU ARE USING CARBON BLADES, DECREASE THESE SPEEDS BY 50% FOR OTHER MATERIALS. TO INCREASE BLADE SPEEDS, TURN THE KNOB COUNTERCLOCKWISE. TO DECREASE BLADE SPEED, TURN THE KNOB CLOCKWISE. DO NOT EXCEED THE UPPER AND LOWER SPEED LIMITS. DO NOT TURN KNOB UNLESS THE MOTOR IS RUNNING.
BLADE SPEED RECOMMENDATIONS
| S.F.P.M. | DIAL # | S.F.P.M | DIAL # |
|---|---|---|---|
| 60 | 1 | 165 | 5.5 |
| 70 | 1.5 | 175 | 6 |
| 80 | 2 | 190 | 6.5 |
| 90 | 2.5 | 210 | 7 |
| 100 | 3.5 | 240 | 7.5 |
| 110 | 3.5 | 265 | 8 |
| 130 | 4 | 300 | 8.5 |
| 140 | 4.5 | 340 | 9 |
| 155 | 5 |
RECOMMENDED CUTTING SPEEDS
| CARBON STEEL | 120 - 325 | 'T' TOOL STEELS | 65 - 130 |
| STAINLESS STEEL | 'M' TOOL STEELS | 65 - 150 | |
| 300 SERIES | 65 - 120 | 'H' TOOL STEELS | 90 - 190 |
| 400 SERIES | 65 - 150 | ALUMINUM | 300 - 340 |
| STRUCTURAL STEEL | BRASS | 275 - 340 | |
| UNDER 1/4*WALL | 150 - 200 | BRONZE | 125 - 340 |
| OVER 1/4* WALL | 100 - 150 | COPPER | 90 - 250 |
NOTE:'
THESE SPEEDS ARE AVERAGE FOR BI-METAL BLADES. IF YOU ARE USING CARBON BLADES, DECREASE THESE SPEEDS BY 50% FOR OTHER MATERIALS, CLL KALAMAZOO SAW, 1800-637-3371 TO INCREASE BLADE SPEEDS, TURN THE KNOB COUNTERCLOCKWISE. TO DECREASE BLADE SPEED, TURN THE KNOB CLOCKWISE. DO NOT EXCEED THE UPPER AND LOWER SPEED LIMITS. DO NOT TURN KNOB UNLESS THE MOTOR IS RUNNING.
Cleaning procedure
· Use the hand broom to brush all the shaving off machine onto the floor.
· Use the rag to clean oil and coolant.
· Sweep up shaving off the floor.
· Vacuum all remaining shavings (on and off machine).
· Lightly coat metal parts with WD40 to protect from rusting.
· Mop the floor if oil or coolant was soiled on the floor.
· Scan 360 degrees around machine repeat above steps if necessary.


